30 DIY Halloween Nail Ideas: Cute, Spooky & Simple
You do not need advanced freehand skills—or extra-long nails—to create a Halloween manicure that looks considered. These 30 ideas range from tiny ghosts and pumpkin dots to glossy webs, vampire tips and full haunted scenes.
Quick answer
Beginner-friendly Halloween nails include tiny ghosts, pumpkin dots, micro French tips, mummy stripes and orange-and-black polka dots. Use a neutral base, keep detailed art to one or two accent nails and choose decals when you want a cleaner finish with less painting.
Choose your Halloween nail style
- Cute: ghosts, pumpkins, stars, candy-corn blocks and playful eyes.
- Simple: micro French tips, polka dots, one-color manicures and a single accent nail.
- Classy: matte black, burgundy drips, gold moons, lace tips and smoky gradients.
- Scary: splatters, stitches, fangs, skulls and graveyard silhouettes.
- Short nails: tiny ghosts, micro French tips, dots, mummy stripes and negative-space accents.
IMAGE PLACEHOLDER — IMG-05-02
IMG-05-02
Tools and color-palette image: dotting tool, fine brush, sponge, black, orange, purple and cream polish
Recommended size: 1200 × 800 px · Aspect ratio: 3:2
Replace this placeholder with the matching image from the image-prompt file.
What you may need
A basic kit can include base coat, two or three polish colors, a top coat, a dotting tool, a fine liner brush, a small makeup sponge, decals and cleanup brush. You do not need every item for every look. Start with the simplest design that matches your skill level, then add detail only after the base layer has dried.
For a complete beginner workflow, read How to Do Halloween Nails at Home. If you are choosing a manicure system, compare gel and acrylic Halloween nails.
Cute and easy Halloween nail ideas
1. Tiny Ghost Accent Nails
Start with a sheer nude or pale pink base. Add one small white ghost on the ring finger with a dotting tool, then use a tiny black dot for each eye. Keeping the other nails solid makes the accent look intentional rather than busy.
Difficulty: Beginner
Best for: Short, almond or square
2. Mini Pumpkin Dots
Use the large end of a dotting tool to place two overlapping orange dots. Add a thin green stem and one curved line with a detail brush. A cream or nude base keeps the pumpkins easy to see.
Difficulty: Beginner
Best for: Short or medium
3. Black-and-Orange Micro French Tips
Paint slim French tips in alternating black and pumpkin orange. Add a glossy top coat for a clean finish. This is one of the easiest options for work, school or anyone who wants a subtle seasonal manicure.
Difficulty: Beginner
Best for: Any length
4. Corner Spiderweb Nails
Draw three fine lines from one corner of the nail, then connect them with two curved arcs. Use white over black for contrast or black over nude for a lighter look.
Difficulty: Beginner to intermediate
Best for: Square or almond
5. Candy-Corn Color Blocks
Create three horizontal bands in white, orange and yellow. Use thin coats and let each color dry before adding the next. If straight lines feel difficult, use striping tape as a guide.
Difficulty: Beginner
Best for: Short or medium
6. Minimal Bat Silhouettes
Paint a small black V-shape, then add a second shallow curve underneath to suggest wings. One or two bats over a pale gray or moonlit-lilac base are enough.
Difficulty: Intermediate
Best for: Medium or long
7. Playful Eyeball Dots
Layer a white dot, a smaller colored dot and a tiny black center. Scatter the eyes across one or two accent nails and keep the remaining nails glossy black, purple or green.
Difficulty: Beginner
Best for: Any length
8. Easy Mummy Stripes
Paint an off-white base, then cross the nail with uneven gray or black lines. Leave a small gap for two dot eyes. The irregular lines make this design forgiving for beginners.
Difficulty: Beginner
Best for: Short or medium
9. Orange-and-Black Polka Dots
Alternate orange and black dots over a cream base, or reverse the colors over matte black. Vary the dot size slightly to create movement without needing detailed drawing.
Difficulty: Beginner
Best for: Any length
10. Slime-Green Drip Tips
Paint a green French tip, pull two or three rounded drips downward with a dotting tool, and connect them along the tip. Neon green feels playful; olive green looks moodier.
Difficulty: Beginner to intermediate
Best for: Medium or long
IMAGE PLACEHOLDER — IMG-05-03
IMG-05-03
Cute and easy designs: ghosts, pumpkins, micro French tips and dots
Recommended size: 1200 × 800 px · Aspect ratio: 3:2
Replace this placeholder with the matching image from the image-prompt file.
IMAGE PLACEHOLDER — IMG-05-04
IMG-05-04
Close-up comparison: black-and-orange French tips, corner spiderweb and mini pumpkin dots
Recommended size: 1200 × 800 px · Aspect ratio: 3:2
Replace this placeholder with the matching image from the image-prompt file.
Classy and subtle Halloween nail ideas
11. Glossy Black Micro French
A narrow black tip over a sheer neutral base gives a quiet Halloween reference that still works after the party. Keep the smile line thin and finish with a high-shine top coat.
Difficulty: Beginner
Best for: Short or almond
12. Burgundy Drip French
Use deep burgundy instead of bright red for a more wearable blood-drip effect. Form rounded drops at different heights, then connect them along the tip.
Difficulty: Intermediate
Best for: Almond or stiletto
13. Purple Aura Nails
Sponge deep purple around the outer nail and keep the center lilac or smoky gray. The soft halo effect feels witchy without relying on a literal Halloween motif.
Difficulty: Intermediate
Best for: Medium or long
14. Gold Moons and Stars
Place tiny gold stars and crescent decals over navy, plum or black polish. Use only one or two elements per nail so the celestial details remain clear.
Difficulty: Beginner to intermediate
Best for: Any length
15. Matte Black with Glossy Webs
Apply a matte black base, then draw a spiderweb with glossy black polish or top coat. The design appears when the light catches it, making it subtle from a distance.
Difficulty: Intermediate
Best for: Medium or long
16. Tortoiseshell Orange Mix
Layer translucent amber, brown and black patches to create a tortoiseshell effect. Use it on two accent nails and pair it with solid black or burnt orange.
Difficulty: Intermediate
Best for: Short or medium
17. Smoky Gray Ombré
Blend charcoal into soft gray with a makeup sponge. A small silver star, moon or black dot near the cuticle adds a seasonal finish without crowding the gradient.
Difficulty: Beginner to intermediate
Best for: Any length
18. Deep Green Cat-Eye Effect
Choose a magnetic deep green polish and follow its product directions to form a narrow reflective line. The finish suggests a mysterious gemstone and does not need extra art.
Difficulty: Intermediate
Best for: Almond or square
19. Black Lace Tips
Paint a thin black French tip, then add tiny scallops and dots below the edge. A sheer blush base keeps the lace pattern crisp and elegant.
Difficulty: Advanced
Best for: Medium or long
20. Negative-Space Skull Accent
Leave the base sheer and outline a small skull on one accent nail. Use simple dots for the eyes and short vertical strokes for the teeth; detailed shading is unnecessary.
Difficulty: Intermediate
Best for: Medium or long
IMAGE PLACEHOLDER — IMG-05-05
IMG-05-05
Classy designs: matte black, burgundy, gold moons, aura and lace details
Recommended size: 1200 × 800 px · Aspect ratio: 3:2
Replace this placeholder with the matching image from the image-prompt file.
IMAGE PLACEHOLDER — IMG-05-06
IMG-05-06
Elegant purple aura and gold celestial Halloween nails
Recommended size: 1200 × 800 px · Aspect ratio: 3:2
Replace this placeholder with the matching image from the image-prompt file.
Bold and scary Halloween nail ideas
21. Crimson Splatter Nails
Use a deep red polish and a stiff brush to create a controlled splatter over pale gray or nude. Protect the surrounding skin and work over a covered surface.
Difficulty: Intermediate
Best for: Medium or long
22. Stitched French Tips
Paint a black or burgundy French tip, then cross the border with short white stitches. Keep the lines uneven for a handmade effect.
Difficulty: Intermediate
Best for: Square or coffin
23. Vampire Fang Tips
Turn two white French tips into pointed fangs and add one small red drop beneath. The shape does most of the work, so the rest of the nails can stay solid.
Difficulty: Intermediate
Best for: Almond or stiletto
24. Silver-Chrome Spider Accent
Use a silver spider decal or metallic gel on one black accent nail. Pair it with plain chrome lines or black nails so the spider remains the focal point.
Difficulty: Intermediate
Best for: Medium or long
25. Haunted-House Silhouette
Create a dusk gradient in purple and orange, then paint a simple black roofline, crooked window and tiny bats. Limit the full scene to one or two nails.
Difficulty: Advanced
Best for: Long almond or coffin
26. Graveyard Gradient
Blend gray into black, then add small tombstone and grass silhouettes near the tip. A pale moon dot gives the scene depth without requiring a detailed landscape.
Difficulty: Advanced
Best for: Medium or long
27. Raised Skull Accent
Use a pre-made 3D skull charm or molded nail-art element rather than trying to build an unsupported shape. Keep raised decorations away from the skin and secure them according to the adhesive instructions.
Difficulty: Advanced
Best for: Long or press-on
28. Black Flame Tips
Sketch narrow black flames from the tip toward the center over a nude or smoky base. A fine liner brush makes the curves easier to control.
Difficulty: Intermediate
Best for: Almond or stiletto
29. Crystal-Ball Purple Nails
Create a pale circular glow in the center of a deep purple accent nail, then surround it with tiny silver stars. Pair with solid plum nails for a balanced set.
Difficulty: Intermediate
Best for: Medium or long
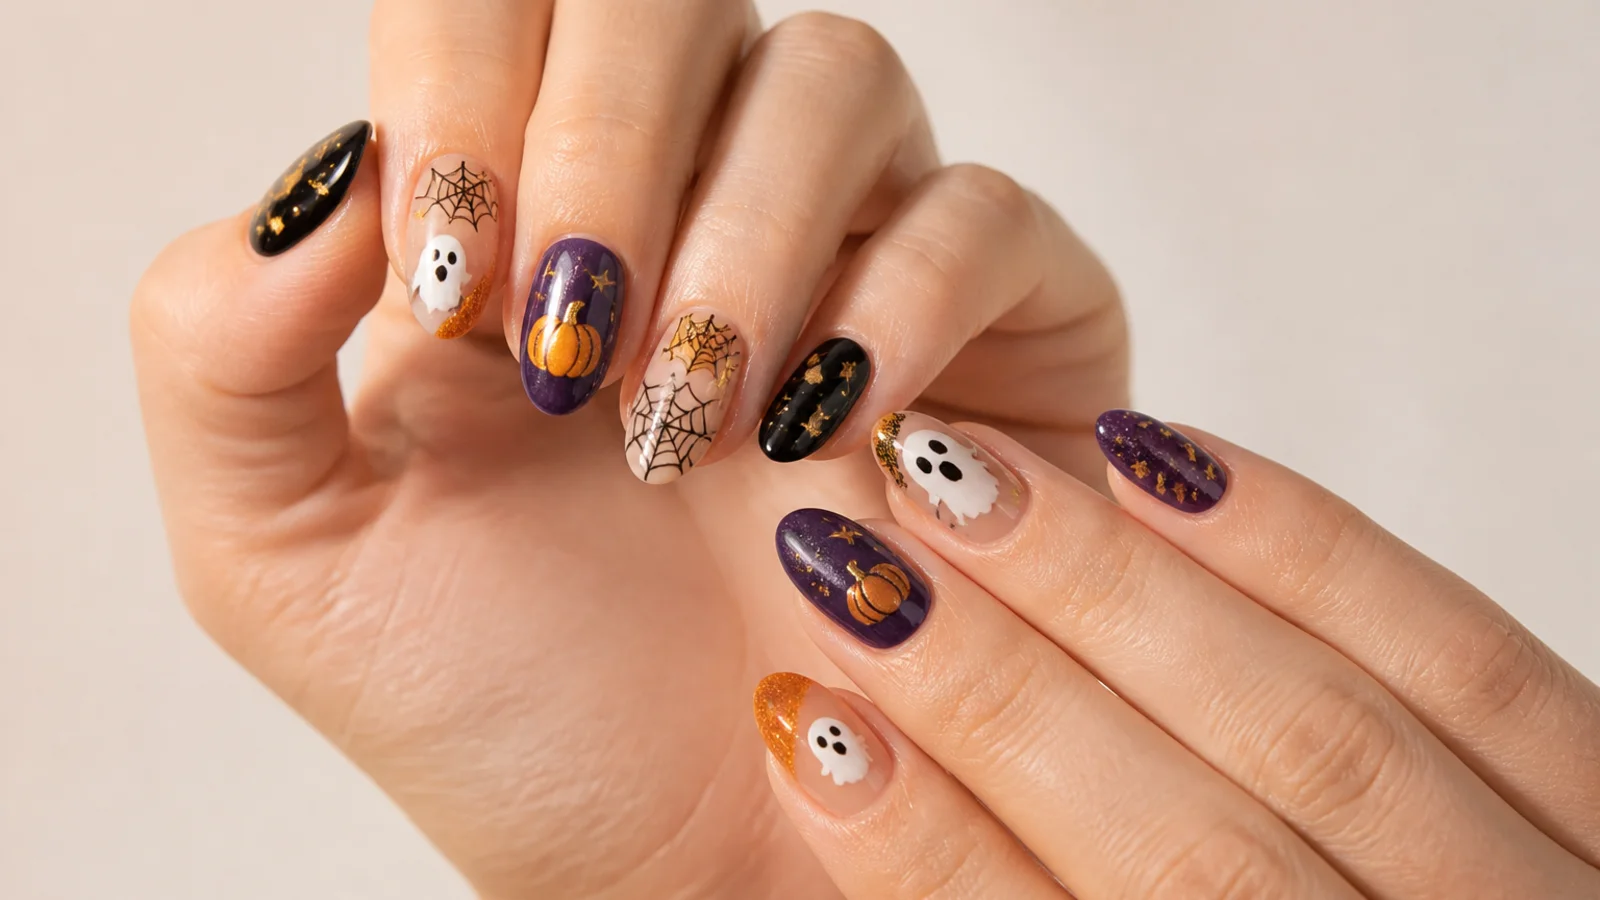
30. Mix-and-Match Halloween Manicure
Combine one ghost, one pumpkin, one web, one solid black nail and one glitter accent. Repeat the same color palette across both hands so the different motifs still feel cohesive.
Difficulty: Intermediate
Best for: Any length
IMAGE PLACEHOLDER — IMG-05-07
IMG-05-07
Bold designs: splatter, stitches, fangs, chrome spiders and black flames
Recommended size: 1200 × 800 px · Aspect ratio: 3:2
Replace this placeholder with the matching image from the image-prompt file.
How to make a mixed manicure look cohesive
Choose one base palette before choosing motifs. Black, pumpkin orange, cream and deep purple work together because every nail shares at least one color. Repeat one finish—glossy, matte or metallic—across the set, and keep the most detailed art to two or three nails. On short nails, use one motif per nail and leave negative space so the design remains readable.
If you use gel products, follow the manufacturer’s curing and removal instructions. The American Academy of Dermatology notes that gel manicures can be hard on nails and recommends measures such as protecting the hands from UV exposure and avoiding picking at lifting polish.
IMAGE PLACEHOLDER — IMG-05-08
IMG-05-08
Cohesive mix-and-match manicure using one black, orange, cream and purple palette
Recommended size: 1200 × 800 px · Aspect ratio: 3:2
Replace this placeholder with the matching image from the image-prompt file.
Nail-care and safety notes
- Work in a ventilated area and follow the directions supplied with polish, gel, adhesive and remover.
- Do not cut or forcefully push back the cuticles. The American Academy of Dermatology identifies cuticle damage as an infection risk.
- Stop using a product if you develop burning, swelling, itching or another reaction, and seek qualified medical advice when appropriate.
- Do not use artificial nails to conceal an unexplained nail problem.
- Secure raised charms according to the adhesive instructions and avoid placing them against the skin.
Read the American Academy of Dermatology manicure-safety guidance.
Frequently asked questions
What are the easiest Halloween nails for beginners?
Tiny ghost accents, pumpkin dots, black-and-orange micro French tips, mummy stripes and polka dots require the fewest detailed strokes. A dotting tool or decal can make these designs easier.
Can Halloween nail art work on short nails?
Yes. Use one small motif per nail, thin French tips and negative space. Tiny ghosts, webs placed in one corner and dot-based pumpkins are easier to scale than full scenes.
What colors work best for Halloween nails?
Black, pumpkin orange, burgundy, deep purple, cream and slime green are versatile choices. For a quieter manicure, use a neutral base with one dark or metallic accent.
Should I use regular polish or gel?
Regular polish is easier to remove and does not require curing. Gel can last longer, but it needs the correct lamp, careful application and appropriate removal. Choose the system you can use and remove safely.
How can I make DIY nail art look cleaner?
Let each layer dry, wipe excess polish from the brush, practice the motif on paper or a nail tip, and use a cleanup brush around the edges. One crisp accent often looks better than several crowded details.
Continue your Halloween nail plan
Move from inspiration to execution with the beginner tutorial, then compare manicure systems or review seasonal gel-kit options.
Final takeaway
The best DIY Halloween manicure is the one that fits your nail length, skill level and plans. Begin with a simple base, repeat a limited palette and use one recognizable motif. Explore more inspiration in Halloween Makeup & Beauty.